
Let the AI Hub find the people you have enrolled in your images and write their names into metadata, using a local AI model that runs on your own server.
A proof of concept
This is a proof of concept. It shows how AI models running locally can recognize people in your images and write the result into WoodWing Assets metadata. It is not a production-ready integration, so use it to explore what is possible rather than as a finished solution.
What is a local AI model?
A local AI model runs on your own server instead of in a cloud AI service. The analysis happens there, and the resulting metadata is saved back to WoodWing Assets. Your images, the profile photos you enroll and the results stay in your own environment and are not sent anywhere else.
Why run it locally?
- Privacy and control: the analysis runs on your own server, and the recognized names are saved back to WoodWing Assets.
- No per-call cost: you do not pay a cloud provider for every image you analyze.
- Flexibility: you choose which model to run and can change it later.
The trade-off is that you host and maintain it yourself, and results may differ from a commercial cloud service.
The quick version
- Open the Recognition Library, select Local Faces, and enroll each person with a few clear photos.
- In WoodWing Assets, select the images you want checked.
- Right-click one of them and choose AI Hub at the bottom of the menu.
- Tick Local Facial Recognition and select Send to AI.
- When the job completes, read the Labels field (or the field it is mapped to) in the Metadata panel.
What you get
For each image, the AI Hub looks for faces and compares them with your gallery. Every enrolled person it finds is written to the Labels field, separated by commas.
A group photo with two enrolled people comes back with both names. People who are not in your gallery are ignored. Nothing is written about them.
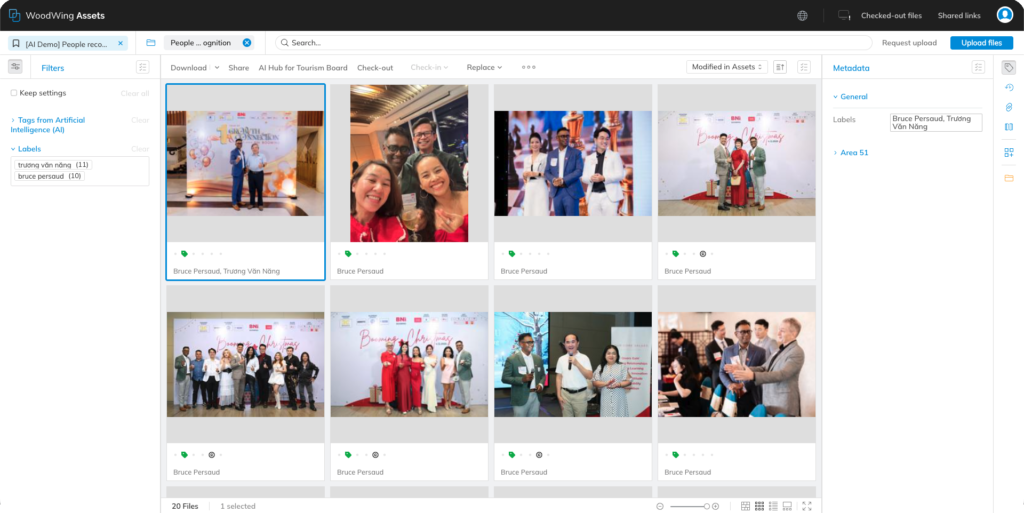
Why Labels? It keeps the demo simple. In your own setup the names can be mapped to a different field or to a custom field, for example one made for people. Everything below works the same way, just with that field.
Enroll a person
Open the Recognition Library and select Local Faces in the left menu. The page has three areas: Your face gallery, Enroll a person and Persons & faces.
- Under Enroll a person, type a name in the Person name field.
- Under Photos, select Choose files and pick several photos of that person.
- Select Enroll.
Each photo should show one clear face. If a photo contains several faces, the largest and most confident one is used. Use photos with different angles and lighting for better results.
A confirmation line appears for every photo that was accepted. The person then shows up under Persons & faces, with the number of enrolled faces next to the name.
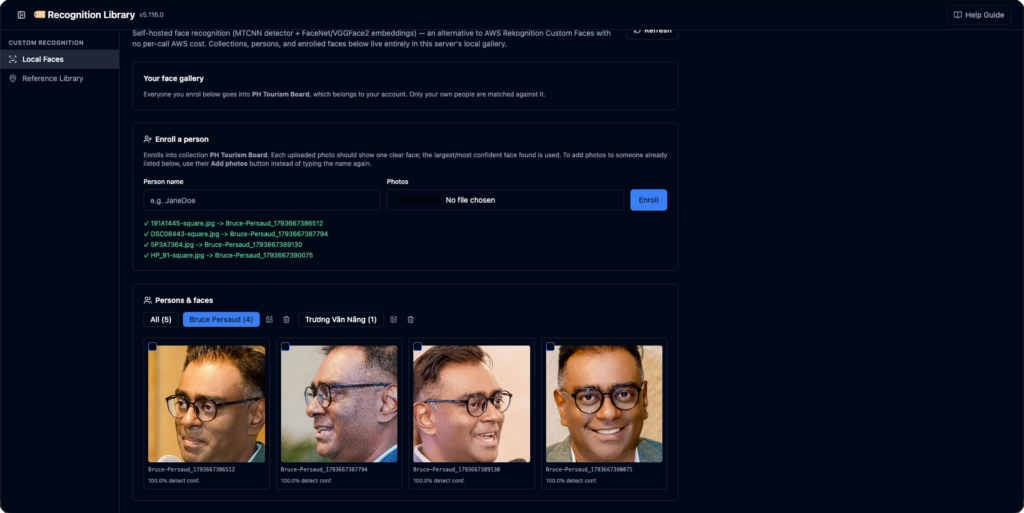
To add photos to someone who is already listed, use the Add photos button next to their name instead of typing the name again.
Review the gallery
Under Persons & faces, select a name to see that person’s faces. Each face card shows a detect conf. percentage, which tells you how sure the detector was that it found a face. Select All to see everyone together. The number next to All is the total across all people, for example All (5) when one person has four faces and another has one.
The trash icon next to a name removes that person and their faces. Use it if someone should no longer be matched.
Run a recognition job
Select your images, right-click, and choose AI Hub. You can also use the AI Hub button in the toolbar above the results, next to Share.
On the Background AI Jobs page, scroll down to Image Analysis Options and tick Local Facial Recognition. You can run it alone, as shown below, or together with Local VLM Description, Local VLM Tags and Identify the place or item shown.
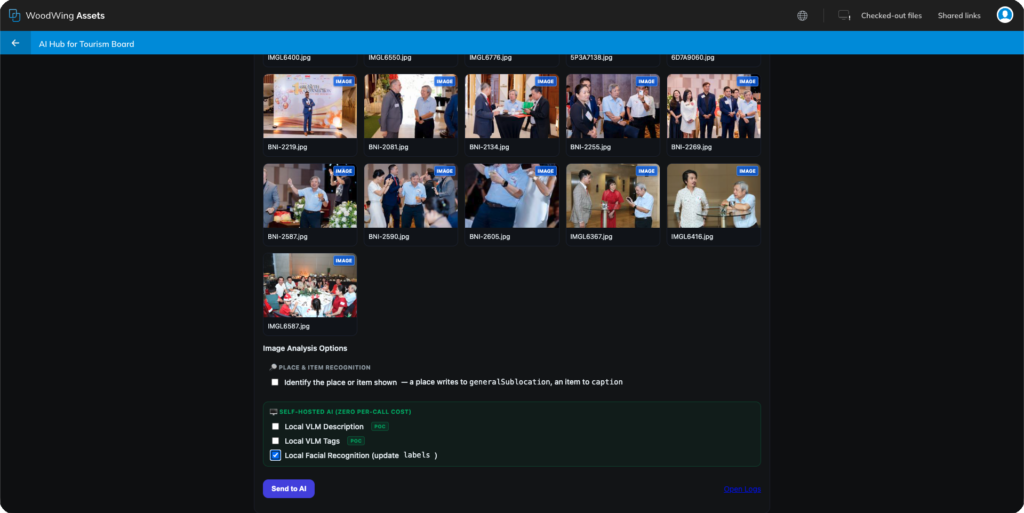
Select Send to AI. In the Live Log, the local-faces step reports match when it finds someone from your gallery. The job ends with job-complete done.
Find people in your library
When the job is complete, go back to your folder and select an image. The Metadata panel shows the recognized names in the Labels field.
Labels is the demo default. If the names are mapped to another or a custom field, look for them in that field in the Metadata panel, and use that field in the Filters panel instead.
The same field also works as a filter. In the Filters panel on the left, open Labels and you will see every name with the number of images it appears in. Tick a name to show only those images. Images with more than one recognized person get their own combined entry, with the names separated by a comma.
Add people and run again
Recognition improves as the gallery grows. A first run might name only one person in a group photo. After a second person is enrolled and the job is run again, the same photo can list both names.
Only the faces you enrolled before the run are matched, so add new people first and then select the images again.
A note on consent
Faces are personal data. Enroll only people who know their photos are used for this, and follow your organization’s privacy rules. The gallery is stored on your own server and belongs to your account, so you stay in control of who is in it and can remove anyone at any time.
