
The AI Hub can work out where a photo was taken and write the place into the Sublocation field. It uses the photo’s GPS coordinates first, then falls back to a Reference Library of your own places and products.
A proof of concept
This is a proof of concept. It shows how an AI model running locally can work out where a photo was taken, or which item it shows, and write the result into WoodWing Assets metadata. It is not a production-ready integration, so use it to explore what is possible rather than as a finished solution.
What is a local AI model?
A local AI model runs on your own server instead of in a cloud AI service. Here it compares your photo with the reference photos in your Reference Library, after the GPS coordinates have been checked. The analysis happens on your server, and the result is saved back to WoodWing Assets. Your images, the reference photos you add and the results stay in your own environment and are not sent anywhere else.
Why run it locally?
- Privacy and control: the analysis runs on your own server, and the results are saved back to WoodWing Assets.
- No per-call cost: you do not pay a cloud provider for every image you analyze.
- Flexibility: you choose which model to run and can change it later.
The trade-off is that you host and maintain it yourself, and results may differ from a commercial cloud service.
The quick version
- In WoodWing Assets, select the images you want located.
- Right-click one of them and choose AI Hub at the bottom of the menu.
- On the Background AI Jobs page, tick Identify the place or item shown.
- Keep Use the photo’s GPS coordinates and Use the Reference Library ticked.
- Select Send to AI, then check the Sublocation field for a place, or the Labels field for an item (or the fields they are mapped to), in the Metadata panel when the job completes.
What you get
A place is written to the Sublocation field, which sits under Location in the Metadata panel. The text follows the wording you set up in the Reference Library, for example Nacpan Beach, El Nido, Palawan, Philippines or Quiapo Church, Quiapo, Manila, Philippines.
An item, such as a product or an object, is written to the Labels field instead. If the AI Hub cannot match the image, the field says Location not identified.
Sublocation and Labels are the demo defaults. In your own setup the place and the item can be mapped to different fields or to custom fields. Everything below works the same way, just with those fields.
How it decides
The AI Hub tries two sources, in this order.
- Use the photo’s GPS coordinates: Works for places only. It is exact when the photo carries GPS data, and it costs nothing.
- Use the Reference Library: Compares the photo with reference photos you have added for your own places and products. It also costs nothing.
If neither source can answer, the setting called “If neither can answer” decides what happens. The recommended choice is “Leave it unidentified”, so the field stays empty instead of showing a guess.
GPS coordinates in a photo take priority over the Reference Library.
Build your Reference Library
The Reference Library is where you teach the AI Hub what your places look like. Open the Recognition Library and select Reference Library in the left menu. The page lists every subject with its Type, Details and number of Reference photos.
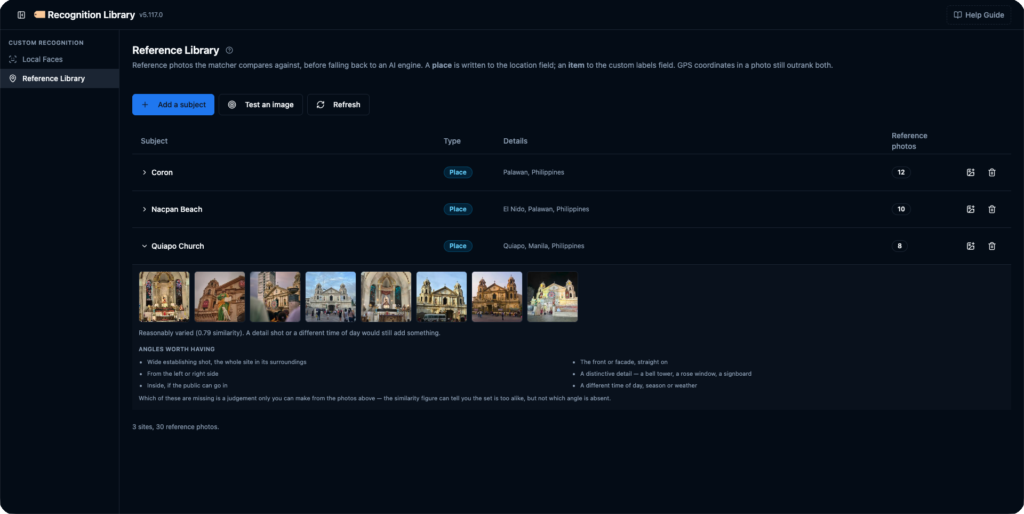
To add a place or an item:
- Select Add a subject.
- Under What is this?, choose Place. Choose Item / Product for an object.
- Type the Place name, or the Item name for an item, using the exact wording you want written into the field.
- Fill in City, Province and Country. For an item, fill in Brand, Range / Line and Manufacturer instead. A line under the fields previews what will be written.
- Select the photo area and choose your reference photos.
- Select Upload photos.
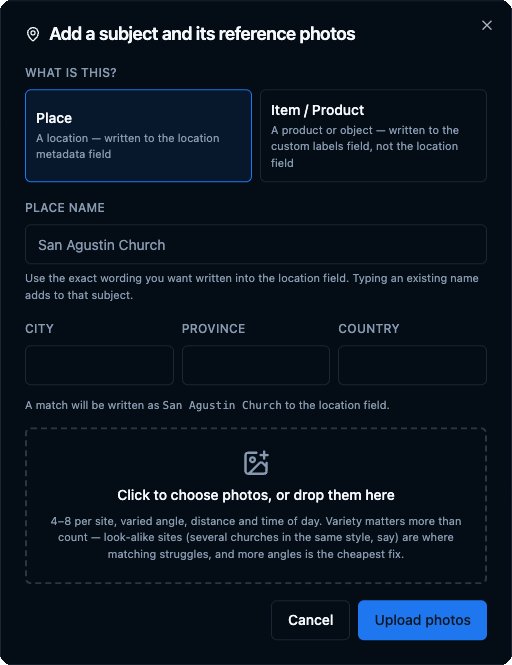
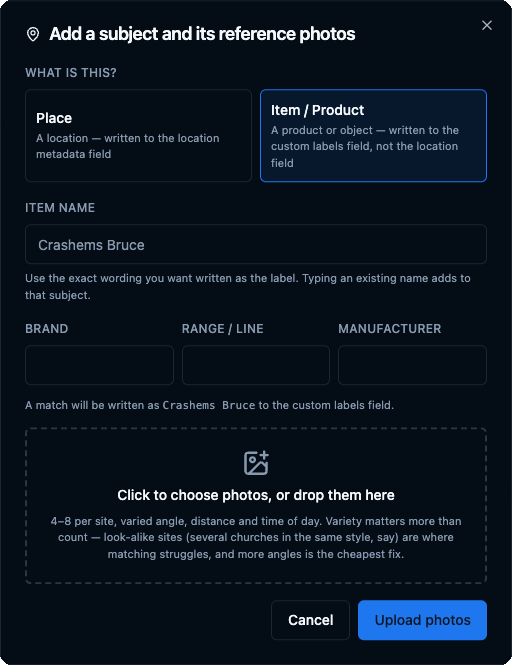
Add four to eight photos per place, with different angles, distances and times of day. Variety matters more than count. Places that look alike, such as several churches in the same style, need more angles.
The first upload also loads the model, which can take a minute. When it finishes, the new place appears in the list, and a summary line shows the totals, for example 3 sites, 30 reference photos.
Test an image first
Select Test an image to see what a real job would decide, without changing anything. Choose a photo and the dialog shows a Would write line with the exact text, plus a Nearest reference photos table with a Score for each match.

Your test photo is only compared. It is never added to the library. If the scores are close together, add more reference photos for that place.
Before and after
In a first run, a beach photo was matched to a place already in the library and came back as Nacpan Beach, El Nido, Palawan, Philippines. A church photo came back as Location not identified, because the church was not in the library yet.
After the church was added with eight reference photos and the job was run again, the same photo came back as Quiapo Church, Quiapo, Manila, Philippines.
