
The AI Hub can read an image, write a short description and add keyword tags to it, all in one job. It runs on your own server, so there is no per-image cost, and it works on one image or hundreds at a time.
A proof of concept
This is a proof of concept. It shows how an AI model running locally can read your images and write a short description and keyword tags into WoodWing Assets metadata. It is not a production-ready integration, so use it to explore what is possible rather than as a finished solution.
What is a local AI model?
A local AI model runs on your own server instead of in a cloud AI service. Here it is a vision language model, an AI model that can look at an image and put what it sees into words. The analysis happens on your server, and the results are saved back to WoodWing Assets. Your images and the results stay in your own environment and are not sent anywhere else.
Why run it locally?
- Privacy and control: the analysis runs on your own server, and the results are saved back to WoodWing Assets.
- No per-call cost: you do not pay a cloud provider for every image you analyze.
- Flexibility: you choose which model to run and can change it later.
The trade-off is that you host and maintain it yourself, and results may differ from a commercial cloud service.
The quick version
- In WoodWing Assets, select the images you want described and tagged.
- Right-click one of them and choose AI Hub at the bottom of the menu.
- On the Background AI Jobs page, tick Local VLM Description, Local VLM Tags, or both.
- Select Send to AI.
- When the Live Log shows job-complete, open an image and read the Description and Tags from Artificial Intelligence (AI) fields (or the fields they are mapped to) in the Metadata panel.
What you get
Each image receives a short description and a list of keyword tags. The example below uses two images, a yawning tiger and fresh tomatoes.
The description
The description is a few plain sentences about what the image shows. It names the subject, the setting and the most visible details. For the tiger, the AI Hub wrote: “The image shows a close-up of a tiger’s face, with its mouth wide open, revealing its sharp teeth and pink tongue. The tiger’s fur is a mix of orange and black stripes, and its whiskers are prominent. The background is slightly blurred, featuring greenery and a textured surface, possibly a wall or a fence. The tiger appears to be in a relaxed or yawning pose.”
The text is written to the Description field, which sits under General in the Metadata panel. Long descriptions are cut off in the field itself. Hover over the field and a tooltip shows the full text, as in the screenshot below.
The tags
Tags are short keywords that describe what is visible. They cover the subject, the setting, objects and mood. The tiger got tags such as animal, feline, fur, mouth open, predator, stripes, teeth, tiger, whiskers and wildlife. The tomatoes got tags such as agriculture, cucumber, food, fresh, harvest, kitchen, still life, tomatoes and vegetables.
The tags are written to the Tags from Artificial Intelligence (AI) field, which sits under General in the Metadata panel. The field shows only the first few tags. Click into it to read the whole list.
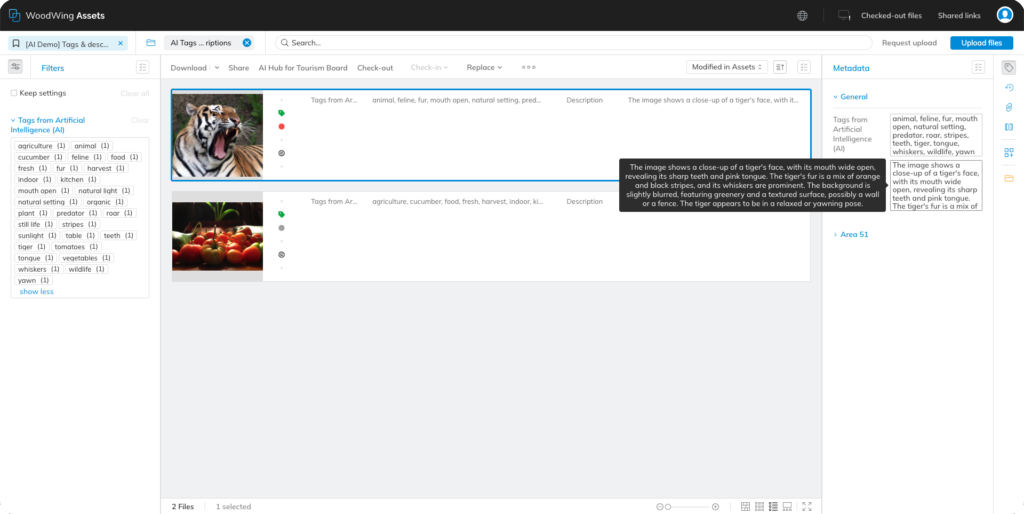
The Description and Tags from Artificial Intelligence (AI) fields are the demo defaults. In your own setup the description and the tags can be mapped to different fields or to custom fields. Everything below works the same way, just with those fields.
Where to find the options
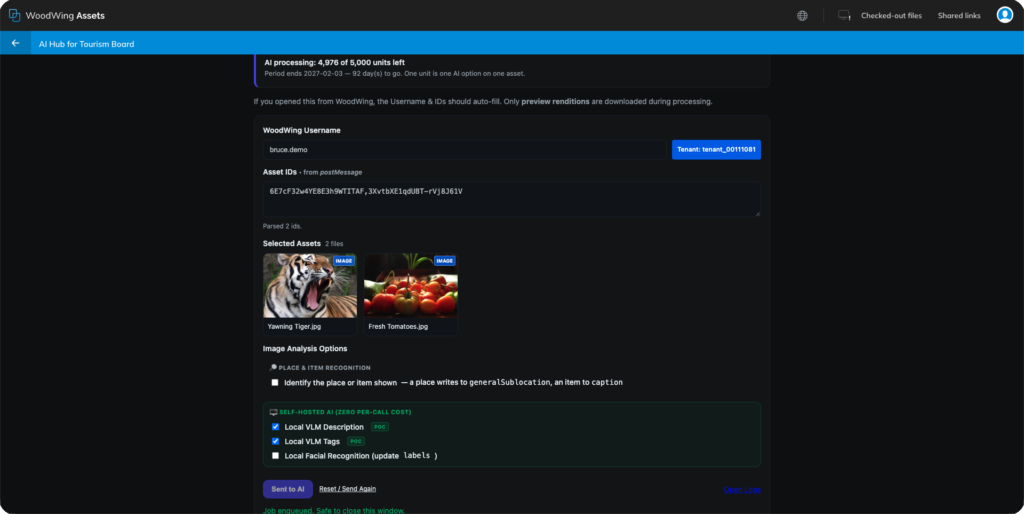
The options sit in the block called Self-hosted AI (zero per-call cost), together with Local Facial Recognition. Local VLM Description and Local VLM Tags run on your own server, so you do not pay per image. Both are marked POC, which means they are still a proof of concept. Treat the output as a strong first draft, have someone read it before you publish, and check the first results before you run a large batch.
Only preview renditions are downloaded while the job runs. Your original files are not touched.
Run a job
Select your images, right-click, and choose AI Hub. The Background AI Jobs page opens with your username, the Asset IDs and a thumbnail for each selected image already filled in.
Tick Local VLM Description, Local VLM Tags, or both. In the example, both are ticked for the tiger and the tomatoes. You can also tick Local Facial Recognition in the same job, so one run fills in the description, the tags and the names together.
Select Send to AI. The button changes to Sent to AI and a green message confirms Job enqueued. Safe to close this window.
Follow the progress
Scroll down to the Live Log. Each image goes through a series of steps, including download, preview-url, auth and local-vlm. When the local-vlm step finishes it shows desc:done, which means the description has been written. It also reports tags with a number, for example tags:16. That number is how many tags were written for that image.
The last line of the log reads job-complete done. If you want the full history, select Open Logs.
Check and edit the result
Go back to your folder and click an image. Open the Metadata panel and look under General. The Description and Tags from Artificial Intelligence (AI) fields now hold the new text.
You can edit both like any other field. If a sentence is wrong, or you want a different tone, change it by hand. Remove a tag that is wrong, or add your own keywords next to the AI ones. Because the AI tags have their own field, they stay separate from any keywords you have entered by hand. Your edit to a description stays in place until you run the job on that image again.
Review tags across many images
Select several images at once and the Metadata panel combines their tags into one list. A number in brackets after each tag shows how many of the selected images carry it. The Filters panel on the left lists the tags in the same way, with a count for each.
This is a quick way to see what a set of images has in common, and to spot a tag that does not belong.
Run it again
Select Reset / Send Again on the Background AI Jobs page, or open the AI Hub from the menu a second time. Running the job again on the same image writes a new description, so only do it when you want the text replaced.
